Fedora 에서 소스를 가지고 VLC 설치

from Info/Tools 2009/04/16 02:08 view 110133
yum install vlc 를 하면 되기도 하지만 vlc 를 변경 하고자 할때 소스 를 통해 설치 해보자.
핵심은 libxxx-devel 을 깔아야 된다는거.

http://www.videolan.org/ 에서 소스를 다운 받는다.

./configure 를 하면 libmad 가 없다고 뜬다.
yum install libmad
yum install libmad-devel

liabavcodec 없다고 뜨면
yum install ffmpeg
yum install ffmpeg-devel

liba52 가 없다고 뜨면
http://liba52.sourceforge.net/ 에서 소스를 다운받고 설치.

혹시라도 make install 도중 relink 어쩌고 저쩌고 에러가 뜨면 전에 수행한 make 과정이 남아있는 거므로
make clean 을 수행한후 다시 진행해보면 된다.
gdb vlc 를 수행 시키기 위한 방법. 그냥은 안되네..

1. http://www.live555.com/liveMedia/public/  메뉴얼 보고서 live 깔고 다른건 yum install xx 를 통해 깔자.

2. debug 를 위한 configure .. , yum install faad2*, libdca* 과 같은 라이브러리가 필요하기도 함.

./configure --enable-x11 --enable-xvideo --disable-gtk --enable-sdl --enable-ffmpeg --with-ffmpeg-mp3lame --enable-mad --enable-libdvbpsi --enable-a52 --enable-dca --enable-libmpeg2 --enable-dvdnav --enable-faad --enable-vorbis --enable-ogg --enable-theora --enable-faac--enable-mkv --enable-freetype --enable-fribidi --enable-speex --enable-flac --enable-livedotcom --with-livedotcom-tree=/usr/lib/live --enable-caca --enable-skins --enable-skins2 --enable-alsa --disable-kde--disable-qt --enable-wxwindows --enable-ncurses --enable-release --enable-debug


Tag | , ,

더욱 자세한 사항은 http://www.pyrasis.com/main/Subversion-HOWTO 를 참고한다.

Apache로 말고 순수하게 svn:// 로 접속해서 사용할 수 있도록 만들고자 한다. svn://을 사용하면 Apache를 사용할때보다 더욱 빠르다고 한다.

먼저 SVN을 사용하기 위해서 저장소(Repository)를 만들어야 한다. 이 저장소는 프로젝트마다 하나씩 필요할 것이다. 난 /home/svn/에 저장소 root를 잡을려고 한다.

#mkdir /home/svn

그런 다음 만든 svn폴더로 가서 파일 시스템(버클리 DB를 사용할 수도 있다.)을 이용한 sample이라는 이름으로 저장소를 만든다.

#cd /home/svn
#svnadmin create --fs-type fsfs sample

/home/svn/sample/ 로 가서 ls를 하면 관련 파일들이 있으며 여기 있는 파일을 임의로 수정하게 되면 데이타를 다 잃어버릴 수도 있으니 주의하기 바란다.

이제 SVN을 실행한다. 실행하면 3690 포트가 열린다.

#svnserve -d -r /home/svn

테스트 하기 위해

#svn checkout svn://(서버 IP또는 도메인)/sample

checked out revision 0. 이 나오면 제대로 설정한 것이다. 현재상태는 누구나(Anonymous) 저장소에 접근해서 체크아웃, 커밋이 가능하다.


Svnserve에서 ID로 인증하기

Subversion 0.33.0 이후로 ID로 사용자 인증이 가능하게 되었다. 그래서 아까 만들어 놓은 저장소안에 /home/svn/sample/conf/svnserve.conf 파일을 찾아서 설정만 해주면 된다.

#vi /home/svn/sample/conf/svnserve.conf

### This file controls the configuration of the svnserve daemon, if you
### use it to allow access to this repository.  (If you only allow
### access through http: and/or file: URLs, then this file is
### irrelevant.)

### Visit http://subversion.tigris.org/ for more information.

[general]### These options control access to the repository for unauthenticated
### and authenticated users.  Valid values are "write", "read",
### and "none".  The sample settings below are the defaults.
anon-access = none
auth-access = write

### The password-db option controls the location of the password
### database file.  Unless you specify a path starting with a /,
### the file's location is relative to the conf directory.
### The format of the password database is similar to this file.
### It contains one section labelled [users]. The name and
### password for each user follow, one account per line. The
### format is
###    USERNAME = PASSWORD
### Please note that both the user name and password are case
### sensitive. There is no default for the password file.
password-db = passwd
### This option specifies the authentication realm of the repository.
### If two repositories have the same authentication realm, they should
### have the same password database, and vice versa.  The default realm
### is repository's uuid.
realm = jidolstar's Repository

위 와 같이 설정하면 anon-access=none에 의해 아무나 read를 못하게 막는다. 만약 이부분이 read라면 아무나 들어와 읽을 수 있다. 그리고 auth-access=write는 ID로 인증된 사람만 쓰기 권한을 주게 된다.
password-db = passwd는 /home/svn/sample/conf/ 아래에 passwd 이름으로 ID를 만들 수 있다.
이것은 다음과 같이 만든다.

#vi /home/svn/sample/conf/passwd

[users]
sampleuser = password1234

설정이 완료되고 svn checkout svn://(사용자 도메인)/sample 으로 접속하면 ID와 비밀번호를 입력하여 성공하면 "checked out revision 0" 이 나온다.

여기서 잠깐!!!
외부에서 우리가 설치한 SVN에 접근하기 위해서는 반드시 3690 포트가 열려 있어야 한다.

3690 포트가 열려있는지 확인하기 위해 다음과 같이 확인해보자

# nmap localhost -p1-9999
....(생략)
3690/tcp open  unknown....(생략)
Nmap run completed -- 1 IP address (1 host up) scanned in 1.165 seconds

3690 포트가 없다면 방화벽을 의심해본다.

# vi /etc/oops-firewall/filter.conf
에서 TCP_ALLOWPORT에 3690을 추가한다.
그리고 firewall을 다시 실행한다.

# service oops-firewall restart
Tag | , ,

Fedora 에서 쓸만한 ftp-server VSFTPD

from Info/Tools 2009/04/13 16:29 view 63838
vsftpd 는 현재 사용자 계정에 접속할 수 있도록 해주는 유용한 ftp server 이다.

각종 옵션이 있지만 대충 설정해주고

more..


service vsftpd start 해준다.

vsftpd 를 실행후에도 설정해준 계정으로 접근을 할 수 없을 때 SELinux 때문인듯..

[root@serahero vsftpd]# setsebool -P allow_ftpd_full_access=1
[root@serahero vsftpd]# setsebool -P ftp_home_dir=1

을 통해 폴더의 접근을 가능하도록 해줘야 겠다.

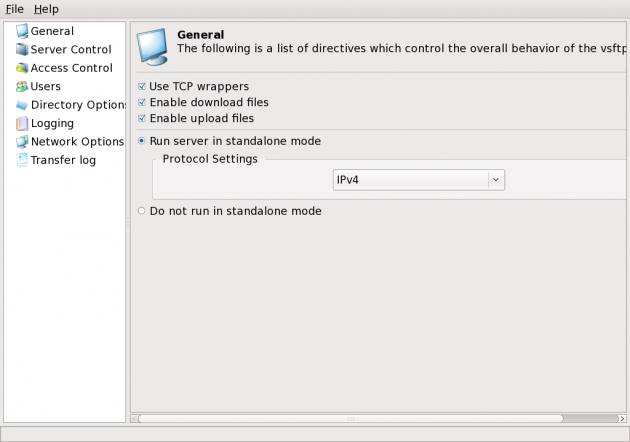
Very Secure FTP Daemon Configuration 이라는 GUI 툴도 존재한다. ㅋ..

사용자 삽입 이미지

Tag |

Bash Shell 단축키

from Info/Tools 2009/03/07 15:00 view 36490
bash shell 에서 제공되는 단축키

참고로 Ctrl + l 같은 경우에 화면을 전부 지워주는 clear와 같은 기능을 하므로 작업효율을 올려준다.
Xwindow 환경이라면
Alt 조합을 사용할 수 있기 위해서..
Edit -> Keyboard Shortcuts... -> F10, Menu Key 를 체크를 풀어주자.


____________CTRL Key Bound_____________
Ctrl + a - Jump to the start of the line
Ctrl + b - Move back a char
Ctrl + c - Terminate the command
Ctrl + d - Delete from under the cursor
Ctrl + e - Jump to the end of the line
Ctrl + f - Move forward a char
Ctrl + k - Delete to EOL
Ctrl + l - Clear the screen
Ctrl + r - Search the history backwards
Ctrl + R - Search the history backwards with multi occurrence
Ctrl + u - Delete backward from cursor
Ctrl + xx - Move between EOL and current cursor position
Ctrl + x @ - Show possible hostname completions
Ctrl + z - Suspend/ Stop the command

____________ALT Key Bound___________
Alt + < - Move to the first line in the history
Alt + > - Move to the last line in the history
Alt + ? - Show current completion list
Alt + * - Insert all possible completions
Alt + / - Attempt to complete filename
Alt + . - Yank last argument to previous command
Alt + b - Move backward
Alt + c - Capitalize the word
Alt + d - Delete word
Alt + f - Move forward
Alt + l - Make word lowercase
Alt + n - Search the history forwards non-incremental
Alt + p - Search the history backwards non-incremental
Alt + r - Recall command
Alt + t - Move words around
Alt + u - Make word uppercase
Alt + back-space - Delete backward from cursor

----------------More Special Keybindings-------------------

Here "2T" means Press TAB twice

$ 2T - All available commands(common)
$ (string)2T - All available commands starting with (string)
$ /2T - Entire directory structure including Hidden one
$ 2T - Only Sub Dirs inside including Hidden one
$ *2T - Only Sub Dirs inside without Hidden one
$ ~2T - All Present Users on system from "/etc/passwd"
$ $2T - All Sys variables
$ @2T - Entries from "/etc/hosts"
$ =2T - Output like ls or dir
Tag | ,

Fedora Network Manger(고정IP사용)

from Info/Tools 2009/02/27 12:27 view 70525
cmd #1

/etc/init.d/NetworkManager stop
ntsysv
(NetworkManager 해지, network 체크)
system-config-network-tui
(고정아이피및, DNS추가)
(network 사용 체크, 사용하고자 하는 고정IP 체크)
service network restart
init 6

cmd #2
ping sendto: Network is unreachable 이 발생했을 때 이런 방법으로 해결..

Edit /etc/sysconfig/network-scripts/ifcfg-eth0 (or whatever device)

DEVICE=eth0
IPADDR=*insert IP address here"
NETMASK=*insert netmask here*
NETWORK=*insert network address here*
BROADCAST=*insert broadcast address here*
GATEWAY=_insert gateway address here*
ONBOOT="yes" = interface will be active at boot time.
       "no"  = interface will NOT be active at boot time.

.If you have X-Windows set up, you can also use RH's "Network Configurator" (/usr/bin/netcfg) which actually writes to these files.
Additionally, after editing the file, do a "ifup eth0" to activate it and ifdown eth0 to deactivate it.


NetworkManager #1

NetworkManager provides automatic network detection and configuration for the system. Once enabled, the NetworkManager service also monitors the network interfaces, and may automatically switch to the best connection at any given time. Applications that include NetworkManager support may automatically switch between on-line and off-line modes when the system gains or loses network connectivity.

These facilities are most useful for modern laptops, where the user may move between wireless networks, and plug in to a variety of wired networks, but NetworkManager also provides features that are relevant to workstations. Current versions of NetworkManager support modem connections, and certain types of VPN. Development of these features is ongoing.

NetworkManager requires Fedora to have drivers for the wired and wireless interfaces on the computer. Many manufacturers of modems and wireless devices provide limited support for Linux. You may need to install additional drivers or firmware on your Fedora system in order to activate these interfaces.

Drivers first
NetworkManager may only work with network interfaces once the relevant drivers are correctly installed on your system. Reboot your system after installing a new firmware or a new driver in order to ensure that the changes take effect.

Enabling NetworkManager on Fedora

Command line way

The installation process for Fedora automatically provides NetworkManager. To enable it, enter the following commands in a terminal window:

1. Set the main service to automatically start on boot: su -c '/sbin/chkconfig --level 345 NetworkManager on' 1. Start the service: su -c '/sbin/service NetworkManager start

For each su command, enter the root password at the prompt.

Graphical Way

Start the system-config-services program, enter your root password and activate the NetworkManager service for runlevel 5.

Gnome-specific information

The NetworkManager tray icon automatically appears on your desktop once the services are started. If the NetworkManager service is active, then the tray icon appears each time that you log in to your desktop.

NetworkManager also stores any encryption keys in the gnome-keyring manager. If your are prompted to enter the keyring password after login, then keep reading. If your login password & the keyring password are the same, then there is a tool built to open the keyring for you on login. The package is called pam_keyring. To configure your system first install pam_keyring with yum:

su -c 'yum -y install pam_keyring'

Second you'll need to modify your /etc/pam.d/gdm file.

su -c 'gedit /etc/pam.d/gdm'

Add the following lines

auth    optional    pam_keyring.so try_first_pass
session optional pam_keyring.so

The order in which this lines are placed in this file are important, here is a copy from a working system

#%PAM-1.0
auth required pam_env.so
auth optional pam_keyring.so try_first_pass <---
auth include system-auth
account required pam_nologin.so
account include system-auth
password include system-auth
session optional pam_keyinit.so force revoke
session include system-auth
session required pam_loginuid.so
session optional pam_console.so
session optional pam_keyring.so <---

Now reboot your computer. After login the keyring will be unlocked for you. If your keyring password is different from your login password, don't worry, there is a tool available to change it.

su -c 'yum -y install gnome-keyring-manager gnome-keyring pam_keyring

Once you have installed pam_keyring and gnome-keyring, you will need to log out and back on. Then you can run

/usr/libexec/pam-keyring-tool -c

to change the default password. Alternatively you can now change a password through gnome-keyring-manager. Download and install gnome-keyring-manager. Then highlight the keyring and select Change Keyring Password from the Keyring menu of gnome-keyring-manager.

KDE specific information

To control NetworkManager by a system tray applet you need to install and start the program knetworkmanager of the same named package. The keys to the different networks are stored automatically in KDE's password storage system kwalletmanager.

Further Information


Retrieved from "https://fedoraproject.org/wiki/Tools/NetworkManager"

NetworkManager #2

Fedora 10 uses NetworkManager by default. The primary settings for any network devices will be automatically selected at installation time. Since there is no screen for selecting networking options, most devices will default to using DHCP.

Using NetworkManager has greatly improved networking for many wireless and some less common devices (mobile broadband, GSM, etc.), it may still have problems with some configurations. NetworkManager development and integration into Fedora is still an ongoing effort.

NOTE: The following steps do NOT apply to all users. NetworkManager is highly recommended for Laptop users, especially using wireless with security.

Disabling NetworkManager and Enabling network Service

On machines with a fixed networking device and a fixed IP address (e.g. desktop, server, appliance), it might be more practical to disable NetworkManager and use the older network service. Additionally users requiring virtual device types (bridging, bonding, or VLANs) will also need to use the network service.

Note that the Fedora 10 installer disables the network service by default. To switch to using the network service:

First disable NetworkManager and prevent it from automatically loading:

[mirandam@charon ~]$ sudo /etc/init.d/NetworkManager stop
Stopping NetworkManager daemon: [ OK ]

[mirandam@charon ~]$ sudo /sbin/chkconfig --level 35 NetworkManager off

Next, configure your network settings:

[mirandam@charon ~]$ sudo system-config-network

You should have an eth0 device already showing. To configure the IP settings click on Edit. Do not forget to set DNS on the DNS tab (if you're using fixed IP's). Make sure the eth0 is selected as Active. Then File > Save and quit.

Next, enable the service and make sure it loads at next boot:

[mirandam@charon ~]$ sudo /etc/init.d/network start
Bringing up loopback interface: [ OK ]
Bringing up interface eth0: [ OK ]

[mirandam@charon ~]$ sudo /sbin/chkconfig --level 35 network on

While it may be possible to re-activate your network without a reboot, it may be recommended to reboot.

Startup Applications Requiring Network

Some applications require the network to be initialized during boot. If you are using NetworkManager and having these problems, edit /etc/sysconfig/network as 'root' and add the following line:
NETWORKWAIT=1. Or run:

[mirandam@charon ~]$ sudo su -c 'echo NETWORKWAIT=1 >> /etc/sysconfig/network'

Some related information can be found on the Fedora Wiki.

Feng 설치가이드

from Info/Tools 2009/02/25 16:11 view 143711

// 대략 정리 한거...make 도중 에러가 나면 configure 에서 버젼을 낮춰주거나 소스를 살짝 고치는 수고(매개변수,NULL->0)도 해야함 ..Fedora에선 잘안됨.CentOS가 잘됨..

// git 나 wget 으로 소스 못 받아오는건 직접 홈페이지에서 받자.

feng source 설치

yum install theor*

yum install git*

yum install faad* // 못찾으면 다른 패키지에서 얻어오기..

yum install faac* //못찾으면 다른 패키지에서 얻어오기..

cd /usr/src 폴더로 이동

wget http://downloads.sourceforge.net/lame/lame-398-2.tar.gz?modtime=1222116320&big_mirror=0

압축풀고 -> ./configure -> make -> make install

yum install yasm

cd /usr/src 폴더로 이동

git clone git://git.videolan.org/x264.git

./configure --disable-asm

make

make install

cd /usr/src 폴더로 이동

wget http://ftp.penguin.cz/pub/users/utx/amr/amrnb-7.0.0.2.tar.bz2

wget http://ftp.penguin.cz/pub/users/utx/amr/amrwb-7.0.0.3.tar.bz2

둘다 압축 풀고 ./configure -> make -> make install

cp /usr/local/lib/libamrwb.so.3.0.0 /usr/lib

ln -s /usr/lib/libamrwb.so.3.0.0 /usr/lib/libamrwb.so.3

cd /usr/src 폴더로 이동

svn checkout svn://svn.mplayerhq.hu/ffmpeg/trunk ffmpeg

./configure --prefix=/usr --enable-static --enable-shared --enable-gpl --enable-postproc --enable-swscale --enable-pthreads --enable-libamr-nb --enable-libamr-wb --enable-libfaac --enable-libfaad --enable-libmp3lame --enable-libx264 --disable-ffserver --disable-ffplay --disable-debug --disable-network --enable-nonfree --enable-avfilter --enable-avfilter-lavf --disable-devices --disable-vhook

make

make install

-- how to install autoconf for feng library --

<< autoconf 버전 낮을 시 버전업그레이드 필요 >>

wget ftp://ftp.gnu.org/gnu/autoconf/autoconf-2.63.tar.gz

-> download latest version

./configure -> make -> make install

-- for Client --

yum install lksctp*

yum install bison-devel

yum install mysql mysql-server mysql-devel

---- feng ---

http://www.lscube.org/ 에서 feng 과 종속라이브러리 들을 다운로드한 후 압축을 푼다.

Dependencies

cd bufferpool

/usr/local/bin/autoreconf -v -i

configure

make

make install

cd netembryo

/usr/local/bin/autoreconf -v -i

configure

make make install

cd libnemesi

/usr/local/bin/autoreconf -v -i

configure

make make install

feng을 다운받고

압축 풀고 ./configure -> vim mediathread/demuxer/demuxer_avf.c

demuxer_avf.c line 210번째 줄

props.bit_per_sample = codec->bits_per_sample;

--> props.bit_per_sample = codec->bits_per_coded_sample; 교체

실행시 feng: error while loading shared libraries: /usr/lib/libavformat.so.52: cannot restore segment prot after reloc: Permission denied

이런 종류 에러가 뜨면 chcon -t texrel_shlib_t /usr/lib/libavformat.so.52 이걸로 해결


이 글은 스프링노트에서 작성되었습니다.

Fedora10 에서 VirtualBox 설치하기!

from Info/Tools 2009/02/21 13:29 view 501788
링크 : http://www.derekhildreth.com/blog/how-to-install-virtualbox-on-fedora-10-tutorial/

This is a tutorial on how to get VirtualBox up and running on Fedora 10. Also, this tutorial is for the 32-Bit version of VirtualBox, so you’ll have to customize a little more to get the 64-bit version running. Everything in the “code” sections should be copy/pasted/typed into the terminal. Right, let’s get to it:

PreStep.) Open the terminal and get into super user mode:
Code:
su -
1.) Get the latest VirtualBox package (as of now, 2.0.6) from the VirtualBox website for Fedora 9 and install it (generally, after a few months, the Fedora 10 link will be available).
Code:

wget http://download.virtualbox.org/virtualbox/2.0.6/VirtualBox-2.0.6_39765_fedora9-1.i386.rpm && rpm -ivh VirtualBox-2.0.6_39765_fedora9-1.i386.rpm

2.) Get the kernel-devel package:
Code:
yum install make automake autoconf gcc kernel-devel dkms
3.) Run the setup file for VirtualBox:
Code:
/etc/init.d/vboxdrv setup
4.) Add yourself to the “vboxusers” group and fix SELinux Permissions:
Code:
usermod -G vboxusers -a username
chcon -t textrel_shlib_t /usr/lib/virtualbox/VirtualBox.so
5.) Run, and enjoy!
Code:
VirtualBox
failed to create the virtualbox com object
Callee RC:
        NS_ERROR_FACTORY_NOT_REGISTERED (0×80040154)
에러가 발생한다면
/tmp/.vbox-your_login-ipc 의 root - root 를 your_login-your_login 로 바꿔주자.
또는 /tmp/.vobx-your_login-ipc 파일을 remove 하면 알아서 다시 생성 해줌으로 알아서..-_ㅡ;;


6.) To Get USB Support:

1 - create a new group called “usb”;
2 - locate file usbfs: in my case is /sys/bus/usb/drivers (I suggest to find the file with a usb device inserted;
3 - modify file /etc/fstab inserting a line containing the right path and the number corresponding the “usb” group :
none /sys/bus/usb/drivers usbfs devgid=503,devmode=664 0 0
4 - command mount -a;
5 - start VB and try…;

Source: Fedora Forums
7.) To Properly Backup the VirtualBox Machine (.vdi):

Please refer to my other page here:

How To: Properly Backup a VirtualBox Machine (.VDI)

8.) To Get Sound Working:

Highlight your virtual machine and click on the “Settings” button. Click on the “Sound” category, and then check the “Enable Sound” option. In the drop-down box, select “PulseAudio”. You should now have sound.
VNC Client for GNOME ( vinagre )

리눅스간에 사용할만한 원격제어 툴..
크기조정, 전체화면 같은 기본적인 기능을 잘 지원한다.
클립보드와 같은 기능도 지원하니 매우 좋음.. ㅋㅋ;;

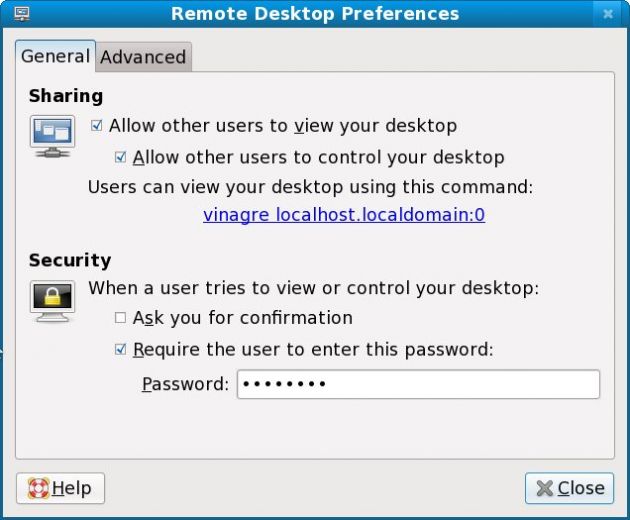
1. 원격 제어를 허용한다. 아무나 접속하는 것을 막기위해 비밀번호를 설정하고 접속확인은 체크 하면 원격지에서 허용해줘야 가능하므로 -_ㅡ 패스~
사용자 삽입 이미지

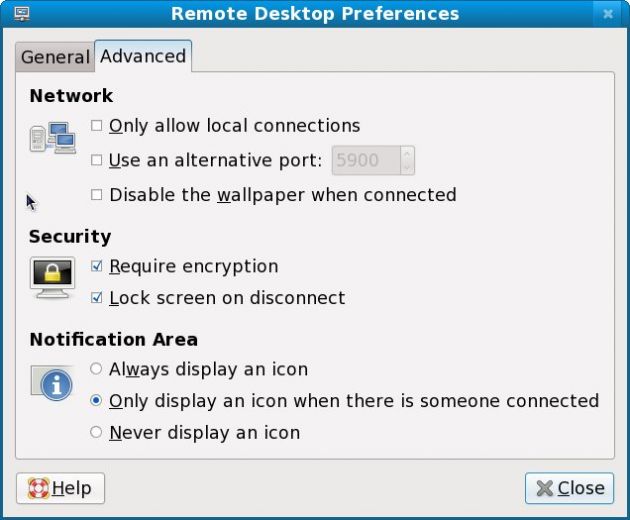
2. 로그아웃 했을 때 로그오프를 수행하도록 해서 원격지 컴퓨터를 보호한다.
사용자 삽입 이미지

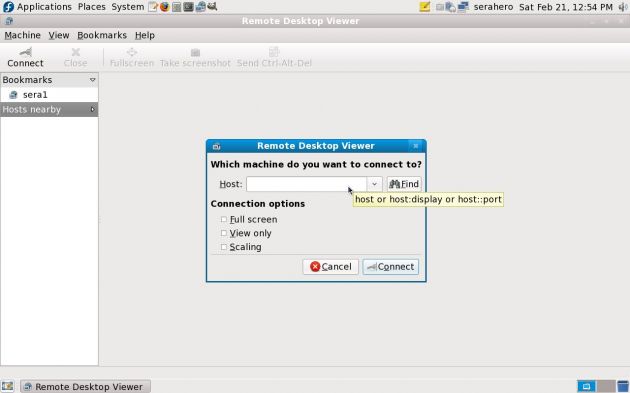
3. vinagre 를 설치해다면 아이피를 쳐서 접속을 해본다.
사용자 삽입 이미지

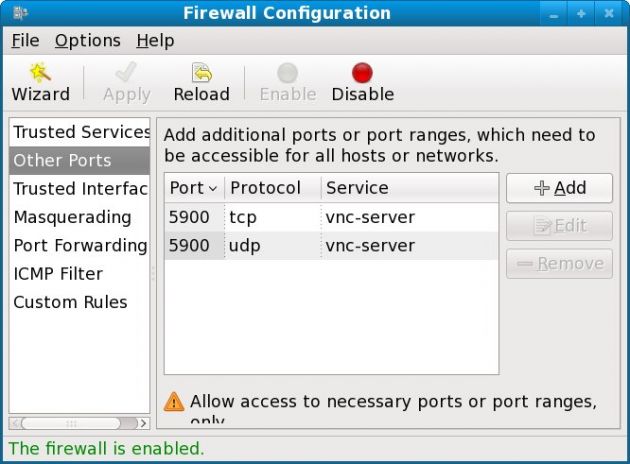
4. 원격지 컴퓨터에서 방화벽 포트를 개방해줘야 접속이 가능해진다.
사용자 삽입 이미지

VMware 상에서의 팁

from Info/Tools 2009/01/02 18:05 view 28601
1. 윈도우-Fedora 공유폴더 설정 or /usr/src/linux 가 없을 경우

일단, http://elecviolin.tistory.com/32 을 보고 설치하면 장땡..

문제는 폴더가 없다고 에러가 나는 경우이다.

'What is the location of the directory of C header files
that match your running kernel? [/usr/src/linux/include]'

'The path "/usr/src/linux/include" is not an existing directory.'

실제 경로가 없다. -_ㅡ..

만능설치기 yum으로 해결..
'yum install kernel-devel'

참고 : http://nosyu.pe.kr/1657?category=1

2. 윈도우와 클립보드 공유 and 화면에 리눅스 크기 맞추는 등 꼭 실행시켜놓을 것..

vmware-user

**마우스가 엉뚱한데 찍히는 버그 있음 -_ㅡ;; 어쩌다 이것저것 하다보니 되긴 했는데 잘 모르겠네...**

Tag | ,

리눅스에서 FTP 사용하기

from Info/Tools 2008/12/30 15:34 view 32832

원문 : http://danggi.tistory.com/entry/리눅스-ftp-사용하기

* 실행 환경 페도라. (우분투도 크게 다르지 않음)

1. ftp 다운로드 하기

]# yum install vsftpd

 -> vsftp는 ftp 이름이다. profrp 도 있다. 원하는 대로 하면 됨.

2. ftp 환경설정

]# vi /etc/vsftp/vsftp.conf

=========== vsftp.conf ================

#임의의 사용자에게 공개할 것인지를 뜻하는 부분 공개 ftp가 아니라면 주석처리 해준다.

# anonymous_enable=YES


# 접속한 사용자가 상위 폴더를 이용하지 못하도록 하는 부분.
# ftp 프로그램 (알 ftp같은 것) 을 이용한다면 상위폴더에 접근 가능하므로 이것을 막아준다.
# 아래 부분의 주석처리를 해지해 준다.
# chroot_list는 어떤 conf 파일에서는 /etc/vsftpd.chroot_list로 되어있는 경우가 있다.
# 상관없으니 그냥 되어 있는대로 하면 됨.

chroot_list_enable=YES
chroot_list_file=/etc/vsftpd/chroot_list


# 저장
================================================

이제 어떤 ID를 상위폴더에 접근하지 못하게 할 것인지를 설정한다.
vsftpd.conf 파일에서 지정해준 chroot_list 위치대로 파일을 연다. (없을때는 그냥 생성 됨)

]# vi /etc/vsftpd/chroot_list

접근을 막을 ID를 써준다. (한줄에 하나씩)

3. ftp 실행

vsftp 데몬을 재시작.

]# /etc/init.d/vsftpd restart

=====================================================

ffp는 리눅스의 일반계정에 등록되어 있는 계정을 쓰면 된다.

Tag | ,